Box Meal Plans, pt.2: Home Chef & Plated

In my last post, I wrote about our foray into boxed meal plan trials. Previously, I reviewed Blue Apron and Hello Fresh. Today, we’re going to talk about Home Chef and Plated, one of which is a clear winner.

We’ve been commenting that the meals seem to have gone from kind of terrible and disappointing slowly upward, each box better than the previous. That was true until we received Home Chef and Plated in that order, but I’m getting ahead of myself a bit.

Home Chef up first: Our first box was two days late arriving because of a weather delay with FedEx. Home Chef’s customer service was great throughout, they kept us posted and when it was clear that our box would be delayed two days, reimbursed us the whole amount and advised us not to eat the contents for safety reasons. We did anyway, it was all fine (but we did prep extra proteins just in case of spoilage).

We were so used to adding more veg or protein and flavors to the previous skimpy, bland meals that we did so with the first thing we made, realizing quickly that we didn’t need to. Home Chef shot to the top, with all three meals being great. We made, in order: the steak, then the pasta, then the pork chop.

meal 1

First Home Chef Box: Great Success!

The steak was Excellent. We picked up two extras to replace the originals just in case and we made them all at once. The portions were perfect, we were floored considering how small the other boxes had been. Standard with all boxes, we supplied the oil, salt, and pepper (though they do send special butter every now and again).

recipe card

Standard two-sided recipe and instructions sheet

steak

Browning the steaks (two were theirs, three were ours, and theirs were better cuts)


The second dish we made was the pasta which honestly, could have appeared in any of the other boxes. It was fine. Nothing spectacular, we added some truffle salt to the whole thing to bring it alive, which helped. Not great, not bad, I gave it a 3 out of 5.

The pork chops however, were the best. We made extras because of the spoilage potential, and supplemented the pretzel coating with panko to make it stretch, while also improvising extra mustard sauce. It was all so good, that one we agreed we’ll make again in the future. We are excited to try the second box, coming in a week after we get through Plated box no.2…

Plated. I’d been told how much people like Plated and how we’d surely like it too. We ordered our first Plated box three years ago and had a bad experience with the produce going off within 24 hours of delivery. Their customer service wasn’t great about it and I wasn’t impressed with that, never using the $10 box credit they finally gave us. BUT we got the same deal this time, four discounted boxes, and decided to give them another shot. Somewhat begrudgingly, we have one more box coming this week because the second set of recipes look good but after that, we agreed that we’re likely done with them.

Screenshot_1

First Plated Box: Resounding “Meh”.

I was sold by the Thai dish, we make a lot of Thai food at home and love the flavors so

prep

Prep for the Beef Rendang

that seemed like an easy option, same with salmon which we frequently eat and of course chicken thighs are the best part of the bird. The beef and the chicken both had terrible timing written into the recipes. They both called for the rice (and beans) to start first and then let sit while the rest is prepped and cooking, but because the rest of the dish required a 20+ minute cook time for the proteins, this meant the rice (and beans) sat long enough to become gummy and dry. I made the beef for us, D made the chicken a few days later and we both had the same issue with timing per the instructions, had we read the recipe well first, we wouldn’t have followed them to the letter. The flavors were just ok, nothing really impressive that we felt with Home Chef. The beef dish was in fact so flavorless that we raided our own Thai ingredient arsenal and doctored the heck out of the sauce to give it some profile besides salt. We saved it but ultimately gave it a 2 out of 5.

spice

Enter a caption

Plated’s packaging leaves a lot to be desired. They send liquid ingredients and spices in packets, and once the packets are jostled around a few times, the spices coat the insides and that means not only does it make a mess to add to the dish, but you lose a pinch left inside the bag to static. It’s a terrible system and of everything they need to change, that’s maybe the most bothersome.

The salmon sandwiches were very oily per the amount used on the fish and the toasted bread, the beef was tough, the grains overcooked. The chicken was the winner there but we agreed that we wouldn’t make any of these recipes again. Typically I would blame tough meat and overcooked grains on the cooks, but in this case we followed the instructions to the letter and that was the result.

Next week’s Plated box looks great and I’m really hoping it makes up for the first run:

Screenshot_2

Plated Box #2: Hoping for Better

Recap: Home Chef is impressive and I would recommend it to anyone that has some skill in the kitchen. Plated was far less impressive, I’d rank it above Blue Apron but below the others. There are deals available for Home Chef and Plated, both of them offering four boxes at a discount before the charge goes to full price (but frequency and content can be altered to bring the price down).

There are a few more boxes we’d be interested in trying, especially as spring and summer ingredients start to come back around. I’m investigating Martha & Marley Spoon, Sun BasketFreshly, and Peach Dish. While I shudder at the idea of spending $70-$80 on a box of only three dinners with no leftovers, we realized that using these meal boxes has cut down on the amount of times per week that we say, “I don’t feel like cooking, let’s go grab something/order in” by a lot. We rarely grocery shop now that we have three meals covered per week, since weekends we eat out or raid the deep freezer for buried treasure. While these $50 per week deals are great, once they expire we’ll have to figure out the revised plan.

Four varieties down, one or two more to go:

Blue Apron
Pro: Most if not all packaging is recyclable. All boxes have an ice pack can be drained and recycled or kept and reused until it eventually bursts (and it will), great for inexperienced cooks or those with little kitchen cookware, and unfussy palates. Pricing is better than average for meal plans of this type.
Con: Portions are small, flavors are often lacking and require additional spices, the app is frustrating to use and frequently bounces a person out to the full site or to the wrong screens.

Hello Fresh
Pro: Some of the packaging is recyclable, the dishes are very tasty and require almost zero additional flavors or ingredients to bulk them up, the techniques are slightly elevated for more experienced cooks, the portions are enough for two full grown adults who like food, a well-done app that includes steps, a timer, and reminders.
Con: Only half of the packaging can be recycled (and there are a lot of plastic bags not marked with recycle symbols). The dishes can be tricky for only one person to make, some of them require timing that works better with two sets of hands, the price is higher than BA. Green onions with every. single. dish.

Home Chef
Pro: Excellent portions! Fresh everything, even when delivery was delayed by two days due to weather, great customer service (they reimbursed us for the whole box because of the delay but offered to credit us instead), good packaging and less of it than Hello Fresh, does not require any additional flavors or ingredients, great serving sizes for two hungry adults.
Con: Not as much recyclable packaging as Blue Apron, which is so far the leader in that regard. The ice pack is half the size of the others which means it’s a little more time sensitive to get everything inside and put into the fridge quickly. Not a con, but if you’re inexperienced in the kitchen or working solo, these dishes are a little more complicated and require a bit more time. Difficult to skip weeks, doing so required a few steps as if I was cancelling the account, no other box made it this difficult.

Plated
Pro: The meals look good on paper, so we’re attempting a second box in hopes that it’s a better bet than the first. The ingredients are slightly more daring and advanced than Blue Apron, but I don’t think the price is justified.
Con: Packaging is lousy and little of it can be recycled, and as mentioned above the spices and liquid ingredients come in small sealed bags which are difficult to empty fully or cleanly. The arugula for the salmon arrived in a breathable veggie bag but was totally wilted three days later with about 10% starting to yellow. Several of the ingredients are packaged separately and scattered throughout the box which can be hard to organize for one trip from the fridge. Portions are on the smaller side, timing per the instructions is very, very off. Not for the inexperienced cook.

Mail Delivery Boxed Meals, a Compare and Contrast (ongoing)

Our lives aren’t so crazy busy that we can’t possibly make dinner for ourselves every night, but we sometimes really don’t want to do much beyond open a box and heat something up. Last time we were in Chicago, we picked up 10 frozen Lou Malnati’s pizzas to keep in our purchased-for-the-occasion deep freezer, for those very moments.

Blue Apron

Blue Apron’s Koren Popcorn Chicken (with added broccoli because we are adults)

But we like to cook and that means that no matter how long the day is or how late we get started, the pots and pans come out and we set to chopping. When we were first married, our living situation was unique and we had to be careful with how elaborate our meals were or how long they took, so we went with a Blue Apron trial which I documented here. That lasted about a year, into a new apartment with more space and time, a long break, then two short revisits over the following two years.

By the end of our third round with Blue Apron, we were decidedly done. The portions, we swore, got smaller. The dishes all seemed to require a fair bit of spicing up plus an addition of extra flavors and even then, we were disappointed about 75% of the time. All the while, I had been receiving Hello Fresh offers in the mail so after a bitter disappointment with BA (the saddest ramen on earth), I paused those deliveries and signed us up with the other. This was a very good decision, it turned out.

We’ve been incredibly happy with the quality and portions of Hello Fresh, I’d put them at about a 90% success rate five boxes in, something we hadn’t been able to say about most of our time with Blue Apron. Thinking that we’d have to spice up the dishes or supplement them with extra veg like we’d been doing previously, we did so for the first three meals. This resulted in way too much food so we stopped. I had a deal that fed us through all of January, four boxes for $54 per box, four meals a week. To continue that quantity after the promo period would have meant spending about $78 per week (with shipping), on four meals. We never spend that much in groceries per week (though that is an average decent dinner out with cocktails once a week, which we’d still do meal plan or no), and we knew spending that much per month would be more than we’d feel good about. After the trial month, I cut it down to two meals per week for about $45. Economically it’s smarter to go with more meals per box but overall, it’s just too much to spend knowing we’d have zero leftovers.

Screen Shot 2019-02-10 at 11.01.19 PM

Hello Fresh’s delicious steak, that sauce was a win!

Aside from portions, what seems to set Hello Fresh apart is that it isn’t afraid to include sources of heat (packets of peppers, spicy sauces, single-serve Sriracha), extra spices, and simple but very tasty dressings for salads. The sourcing is always fresh if not organic (which is just a label and I don’t put a lot of stock in it anyway), sometimes local, always the exact right amount, and neatly packaged. While their packaging isn’t nearly as recyclable as BA’s, a drawback, it takes up less room in the fridge, with each meal in its own paper bag, aside from the proteins. This makes for easy and safely separated storage, compared to BA where the ingredients are thrown together and each must be set located in order to pair with each recipe. I also like that many of their meals can be made without their ingredients, meaning each meal is easily recreated using ingredients at the grocery store.

Feeling adventurous, I cancelled BA altogether after giving detailed dish reviews and feedback on their cancel screen (hey, they asked). I have also paused Hello Fresh for next week’s delivery so we can try Home Chef. I believe that Home Chef also distributes meal kits in grocery stores but I’ve never seen that where we are (I’ve also never looked and if I’m going to the grocery store, I’m going to get a lot and fresh ingredients, not frozen take-and-bake). Their special promo is for three meals per week for three weeks and costs about the same as Hello Fresh’s two meals per week ($54 with tax, free shipping during the trial). The dishes look really good, there are steaks and large pieces of fish, and the sauces and sides seem a little more advanced than we’ve seen so far from either HF or BA.

Once the trial for Home Chef is over, we’ll try Plated again. I had a bad experience with them a few yeas ago during a BA break and an even worse experience with their customer service after reporting the issue, so I’m not tagging them here just yet. I’ll review when the time comes and update the table below to keep track of differences.

They all have the same setup: Double-sided instructions with images, calories, time to prep and cook, and wine pairings.

Blue Apron
Pro: Most if not all packaging is recyclable, ice pack can be kept and reused until it breaks, great for inexperienced cooks or those with little kitchen cookware, pricing is better than average for meal plans of this type.
Con: Portions are small, flavors as often lacking and require additional spices, lots of packaging and not much of it is contained so it requires gathering and organizing before prep, the app is frustrating to use and frequently bounces a person out to the full site or to the wrong screens.

Hello Fresh
Pro: About half of the packaging is recyclable, the dishes are very tasty and require almost zero additional flavors or ingredients to bulk them up, the techniques are slightly elevated for more experienced cooks, the portions are enough for two full grown adults who like food, same reusable ice pack included, a well-done app that includes steps, a timer, and reminders.
Con: Only half of the packaging can be recycled (and there are a lot of plastic bags not marked with recycle symbols). The dishes can be tricky for only one person to make, some of them require timing that works better with two sets of hands, the price is higher than BA

Rosemary Grits with Tomato-Feta Chutney and Poached Egg

IMG_20180819_131230In the Marigny, in New Orleans on Frenchman Street, there is a little place called Cafe Rose Nicaud. I’m proud to say that in my most recent four-day stint in that wonderful city, I hit it up twice. Not only is the coffee excellent, but they have some breakfast items there that will kill you dead. I re-made one of them recently, mostly by hunting down a heavenly recipe for proper southern grits then winging it from there.

Grits recipe (doesn’t include rosemary)
Done on the stovetop, not in a slow-cooker.

Prep Time, 5 mins
Cook Time, 1 hr
Total Time, 1 hr 5 mins
Servings8 servings
Calories435 kcal
Ingredients
  • 2 cups heavy cream
  • 1 1/2 cups half-and-half
  • 3 1/2 cups water
  • 1 stick butter
  • 2 teaspoons salt
  • 1 1/2 cups stone ground grits
  • *1 T rosemary, chopped fine (my addition)
Instructions
  1. Combine all ingredients. Bring to a simmer, stirring occasionally.
  2. Gradually whisk in grits. (Add them too quickly and they will clump.)
  3. Reduce heat to low and cook, stirring frequently, for 50 to 60 minutes.
  4. If grits get too thick add more water or half-and-half.
  5. *Just before grits are done, add chopped rosemary and stir.
***
I’ve never made grits like this, not ones with so much dairy and that took so long. And I’ll tell you what, I’m never going back. This is the only way to go, totally smooth and creamy, and not nearly as heavy as they’d seem.
IMG_20180819_132826_226
* Once the grits were almost finished, I added about 1T finely chopped rosemary and stirred it in.
The tricky part was re-creating the tomato-caper-feta chutney that goes on top of the grits, because I had no capers (truthfully, I’m not a huge fan of them anyway) and no idea how the Cafe created it. So I winged it, as you do. My best guess is below.
While the grits cook, make the:
Tomato Chutney
  • One small (very fresh!) tomato, diced, liquid discarded
  • One half shallot, chopped fine
  • 1 T. olive oil
  • 1 1/2 T. balsamic vinegar
  • 1/2 t. white wine vinegar (to mimic capers)
  • salt & fresh ground pepper to taste

Combine all ingredients in non-reactive bowl, stir and add salt and pepper. Chutney should be tart but not overly so, if it is, add a little more olive oil. Once mix is balanced, cover with cling wrap and set aside. Liquid will be discarded, it’s ok if there’s more, as long as the flavor is right.

Additional Toppings
1/2 t. rosemary (I also added 1/2 t. of basil but would omit next time)
2 T. feta crumbles
Egg(s), poached. One per serving.

Ready to Serve
Spoon grits into individual bowl, top with chutney (about 2 T.).
Add feta to taste, add pinch of rosemary
Top with a poached egg.

IMG_20180819_131050

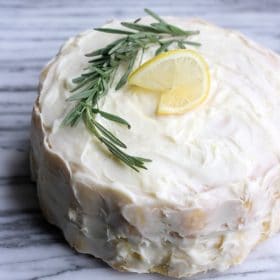
Lemon Rosemary Cake with Lemon Cream Cheese Frosting

FLUFFY LEMON ROSEMARY CAKE WITH LEMON CREAM CHEESE FROSTING

Learn how to make this unique and light and fluffy lemon rosemary cake with lemon cream cheese frosting complete with step-by-step pictures. This is my favorite fluffy yellow cake recipe that always comes out tender and moist! 

5
5 / 5 ()
Did you make this recipe? 

INGREDIENTS:

For the Cake
  • 2 1/2 cups (280 gr) cake flour, plus extra for dusting pans
  • 1 1/4 tsp (5 gr)  baking powder
  • 1/4 tsp (2 gr) baking soda
  • 3/4 tsp (3.6 gr) Morton kosher salt or table salt (use 1 1/2 tsp if using Diamond kosher)
  • 1 3/4 cups (343 gr) granulated sugar (divided)
  • 10 tablespoons (140 gr) unsalted butter, melted and cooled slightly
  • 1 cup (237 ml) buttermilk, room temperature
  • 3 TBSP (44 ml) vegetable oil
  • 2 tsp vanilla extract
  • 1 TBSP lemon zest
  • 1 TBSP fresh rosemary, minced
  • 6 large egg yolks, room temperature
  • 3 large egg whites, room temperature
For the Frosting
  • 8 oz (224 gr) cream cheese, softened
  • 1/2 cup (1 stick, 112 gr) unsalted butter, softened
  • 1 TBSP lemon zest
  • 2 TBSP lemon juice
  • 1 tsp vanilla
  • 2 1/2 cup (298 gr) confectioners sugar

DIRECTIONS:

FOR THE CAKE
    1. Preheat oven to 350F. Grease two 8″ or 9″ round cake pans. Dust pans with flour and tap out excess any excess.
    2. In a large bowl whisk together flour, baking powder, baking soda, salt, and 1 1/2 cups sugar. In another bowl whisk together the melted butter, buttermilk, oil, vanilla, lemon zest, rosemary and egg yolks.
    3. For the meringue: In the bowl of your stand mixer fitted with whisk attachment, beat egg whites at medium speed until foamy. With machine running, stream in the remaining 1/4 cup sugar. Beat at high speed just until stiff peaks form. Gently transfer to a bowl and set aside.
    4. Add flour mixture to the empty stand mixer bowl fitted with whisk attachment. With mixer running at low speed, gradually pour in butter mixture and mix for about 10 seconds. Stop mixer and thoroughly scrape down the bowl. Mix again on medium for 20 more seconds just until combined.
    5. Using rubber spatula, gently fold in 1/2 of the meringue just until incorporated. Fold in the rest of the meringue. Be very gentle to not deflate the air in the meringue. You will have a few white streaks in the batter. Divide batter evenly between your prepared cake pans.
    6. Place pans on a half-sheet pan and bake on the center rack in the oven at 350F for 20-25 minutes, rotating halfway through. The cake will begin pulling away Bake until cake layers begin to pull away from sides of pans and will no longer jiggle in the center when it is finished.
    7. Cool cakes in pans on wire rack for 20 minutes. Run a thin bladed knife around the sides of the pans to loosen cakes then invert on a greased wire rack. Allow to cool completely (about 1 more hour) before frosting.
FOR THE FROSTING
  1. Combine all ingredients in the bowl of a stand mixer fitted with a paddle attachment. Mix on medium speed until combined and creamy. Scrape down the bowl as needed.
  2. Reserve just under half to frost middle layer, using the rest for top and sides. (added that one myself for future reference – P)
IMG_20180710_153543.jpg

Calm before the storm


Remember what I said about being a ridiculous baker? Still true! I prepped my ingredients ahead of time and grouped them, as all smart cooks and bakers do, but when it got to the “melted butter” portion of the program, then it went sideways. And out. And under.

I had just cleaned the microwave two days prior to its pristine, sparkling self. Then I put the butter in and set the timer for 45 seconds. Whoops, too long. Explosion #1. Remove butter, clean microwave (again), take stock of lost butter. Add at least another ounce. Ugh. Cut more butter, add to existing butter, microwave for a scant

IMG_20180710_163452.jpg

“stiff peaks”/”almost butter”

seven seconds. Explosion #2. Remove butter, clean microwave (AGAIN), take stock of lost butter. At least another ounce. Ugh. Add more butter, learn lesson, warm Pyrex of already-melted butter on flat top range (this might be the only thing our electric range is good for).

Then it was time to separate the eggs. Oh look, half a white got into my yolks. Offff course they did. At least it wasn’t the other way around, right? Sure. I stored my mixing bowl and whip attachment in the fridge, since I always heard that stuff should be cold for maximum height, and the whites whipped up beautifully. But um, for maybe a little too long, I was probably about 31 seconds from butter. I passed “stiff peaks” and went into “stiff nearly chunk”, but they still folded in and at least the proteins never separated from the fats (small mercy, since I had used almost twice the amount of butter to make up for the microwave snafu.

IMG_20180710_172226

looking good! until…

Mixed all ingredients, folded whites and batter together, poured into pans, shook for air bubbles, waited to level, added to oven. Whoops, I forgot to put them on a sheet pan but I bet it’ll be ok.

IMG_20180710_172655.jpg

naturally.

It was not. 20 minutes, test. Raw batter in the middle. Five more minutes, test. Still batter. Crap. Google. Notice well-baked top and sides, cover with parchment and insert sheet pan on bottom rack, six minutes. Ding! Perfecto! Tip cakes out of tin. Tin #1: excellent. Tin #2: not excellent. I quickly pulled the stubborn bit away from the bottom of the tin and pressed it onto its mother. This is why the good lord invented crumb coats! No one will know! That bottom will be the middle of the cake, I decide.

Frosting finished without catastrophe, minus almost adding only half the butter. Then it was time to frost. I don’t know if anyone else has this anxiety, but I’m always worried about adding too much frosting to the middle layer and then not having enough for the top and sides. As a result, I regularly wind up with just a thin coating in the middle and a bunch leftover for the rest. That happened here. It presents really nicely once frosted, it tastes so, so good, but it’s lopsided and sad looking.

IMG_20180710_181811.jpg

hey that doesn’t look so bad!

IMG_20180710_182458.jpg

doesn’t taste so bad either.

Next time I’ll add half more rosemary and lemon rind to the batter, and I’ll remember how to portion out the frosting but otherwise: Huge success.

Rosemary Brown Sugar Snickerdoodles

Original recipe found here.

CHEWY BROWN SUGAR AND ROSEMARY SNICKERDOODLES

INGREDIENTS:

  • 1/2 cup unsalted butter, softened
  • 3/4 cup brown sugar (preferably dark brown)
  • 1 TBSP fresh rosemary, finely chopped
  • 1 large egg, room temperature
  • 1/2 TBSP vanilla extract
  • 1 2/3 cup flour
  • 1/4 tsp kosher salt
  • 1 tsp cinnamon
  • 1 tsp cream of tartar*
  • 1/2 tsp baking soda*
  • 1/4 cup sugar
  • 1/2 TBSP cinnamon

DIRECTIONS:

  1. In the bowl of a stand mixer fitted with a paddle attachment, cream together the butter, brown sugar, and rosemary until light and fluffy (about 2 minutes). Mix in the egg and the vanilla until incorporated.
  2. In another large bowl, whisk together the flour, salt, 1 tsp cinnamon, cream or tartar, and baking soda.
  3. With the mixer on low, slowly add in the dry ingredients and mix just until incorporated. Scrape down the bowl as needed.
  4. Cover and chill in the refrigerator for at least 30 minutes and up to 24 hours.
  5. Preheat oven to 375F.
  6. Mix together the 1/4 cup sugar and 1/2 TBSP cinnamon in a small bowl. Roll medium sized dough balls (about 11/2 TBSP) in the cinnamon sugar mixture. Place dough on parchment (or silpat) lined baking sheets and bake at 375F for 10-12 minutes until puffy and the edges are set. The middle will still look underbaked.
  7. Allow to cool for 5 minutes on the baking sheets before removing.

SUBSTITUTION NOTES:

1 tsp baking powder may be substituted for cream of tarter and baking soda.


Baking and I are weary adversaries. Well, that’s not true, baking knows exactly what it’s doing, I am the problem there. I don’t have a diagnosed learning disorder, I’ve never tested as dyslexic or have any mental difficulties that should interfere with reading comprehension, but I will screw up a measurement faster than you can say, “no, TABLEspoon”. This experience was no different, naturally.

After all the ingredients were combined and the KitchenAid was whipping the dough around, I casually re-read the recipe and realized I’d added a whole teaspoon of baking soda instead of a half. I furiously Googled “what happens if I add too much baking soda?” and the answers spoke of ruined recipes, how to salvage (before it’s all mixed together), and lessons learned as a result. Great.

Screen Shot 2018-07-10 at 11.38.49 AM

Screen Shot 2018-07-10 at 11.24.46 AM.png

Definitely use dark brown sugar

I sucked it up and figured they’d turn out bitter or tough, and prepared for the worst. I rolled the dough in balls slightly smaller than ping pong, which seemed “medium” to me per the recipe, and then tossed them in the cinnamon sugar mix. Popped the tray into the oven and set the timer for 10 minutes. Then 11. Then 13. They looked done but still quite puffy. The extra baking soda, I thought.

The second batch went in for 13 minutes firm and came out, well, small. Puffed up and small. They taste, however, amazing. I am growing an herb pot and have more rosemary than I know what to do with, so next up is a Rosemary Lemon Cake, by the same website author as these cookies. Results pending.

Spiced Tea

My favorite clothes love warm weather, my favorite foods love the cold. Go figure.

This tea mix was a staple in my home growing up from the first cool night of autumn to the last one of spring. It’s tangy, sweet, orangey, and spiced perfectly. Tea purists take heed: this uses freeze-dried tea and is in no way, to be mistaken for anything resembling actual tea. I’m not even totally sure how to make it legitimately, with actual tea or tea leaves. I’m open to thoughts, though.

The recipe produces quite a lot of powder mix and it makes a great hostess gift, so double it if you’re feeling generous.

Spiced Tea

  • 1 lb. orange Tang (when I was younger, this came in a large glass jar, now it’s the squaty plastic containers with measuring cup on the inside of the lid. Handy!)
  • 1 c. instant tea
  • 1 c. white sugar
  • 1 t. cinnamon
  • 1 t. ground cloves
  • 2 pkg. lemonade mix (Kool Aid-type packages, doesn’t matter the brand, just so the packages are 0.15 oz)

Mix together, store in an airtight container.
Use 2T mix to 8 oz. of hot water, stir until dissolved (but it’s never totally dissolved). Add bourbon if you like. I haven’t tried that yet, but I should…

tea.jpg

Spiced Tea mix, ready to go.


Breakfast Bombs

If you’re anticipating a participation brunch, company in your home, or a fast breakfast for any reason, look no further. These biscuit bites are easy, filling, and if you’re hard up for prep time, can be prepped the night before then assembled and tossed into the oven (or toaster oven, if you’re like me who likes efficiency and not bending down) the next day. Apologies for the egregious use of corporate shilling in the original recipe site. I’ve omitted all of that in the copy/paste version shown here because ads suck.

Her recipe is written somewhat inaccurately and requires a few more tips and tricks than she lists, so I’ve marked mine with a *.

While we made these for a BYO brunch, we also winged it and made Sausage Gravy-Stuffed Biscuits which were gobbled up faster than the Breakfast Bombs.

Breakfast Bombs

Makes 8 but you can easily double the batch

  • 4 breakfast sausage patties*
  • 3 eggs, scrambled*
  • 1/4 cup of shredded fancy cheese*
  • 1 8-count package of standard crescent rolls

Directions:

  1. Pre-heat your oven to 375 degrees
  2. Take a non-stick muffin pan and space out 8 crescent dough triangles gently inserted into the muffin tin spaces*
  3. Fill each dough triangle with a tablespoon of eggs
  4. Then place a cooked, halved sausage patty on top of the eggs
  5. Finish each with a sprinkle of cheese**
  6. Wrap your dough corners over the top to cover most of the filling
  7. Bake for 12 mins at 375
  8. Eat while hot

*****

* In the original recipe, she recommends using pre-pattied sausages. Instead, I bought a tube of good old Jimmy Deans (and the second time we used sausage we made), formed them into patties like your normally would, and cooked them up. I cut them into halves but since the sausages we cut tend to be thicker than pre-cut, wound up using third pieces instead of half.

Season your eggs! The first time I made this, I was laid up after having gallbladder surgery and wasn’t really thinking about what I was doing. They were bland, not even the sausage and cheese saved them.

* She mentions that she doesn’t use non-stick muffin tins or spray because the grease from the biscuits and sausage is enough. This is accurate to a point, but if you don’t pop the biscuits out of the tins immediately after cooking, the dough will stick to the bottom just a bit. Nothing catastrophic, but it’s not a perfect system.

** I don’t think a 1/4 cup of cheese is enough. I put a teaspoon or so of shredded cheddar in each tin. It takes a little practice, the egg and sausage should look like the same visual amount, but the cheese is a wild card in that respect. When in doubt, err on the side of more cheese since the biscuits can be a bit dry if the ingredient proportions aren’t quite right. Do I have to actually say to use more cheese though? Doubtful.

sausage-egg-cheese-bombs

Recipe author’s photo, shown for how to layer (your cheese should look like the top right biscuit, not the center).

Sloppy Joe, Slop Sloppy Joe

All credit for that title goes here.

A few weeks ago, my friend asked me for some dishes that would feed a family, made ahead of time and frozen, as the mom was facing surgery and friends were pitching in to prep meals. I sent her a few ideas, but for my money and time, it’s hard to beat a giant vat of Sloppy Joe’s for volume, satisfaction, and tastiness. It freezes well, reheats well, and can be eaten plain, on a bun, with slaw or chips, etc.

I almost always double this recipe.

Mom’s Sloppy Joe

Ingredients

2.5 lb. ground beef (90%/10% if you can swing it, 80% will produce a lot of fat but you can still go with it)
1 med. yellow onion, chopped fine
1 c. ketchup (this is the only time ketchup is in our home, we are mustard people)
1 T. vinegar
2 T. brown sugar
1/2 t. dry mustard (you want the kick of the dry you don’t get with prepared)
3T. Worcestershire Sauce
water as needed

Brown beef and onions together until onions are translucent and fat renders out, drain fat.

Add all ingredients to large pot and add beef and onions, stir until well mixed.

Simmer two hours, stir occasionally. Add water to thin as needed.

****

And that’s it. If I’m making some for later, I wait until it’s cooled, cold is even better, remove whatever fat has come to the top, and pack it in storage containers to stick in the freezer. It microwaves or stovetops back to life perfectly.

I know a lot of people put celery, cumin, or tomatoes in their Sloppy Joes but this is what I was raised on: simple, straightforward, no frills. It’s tangy and sweet, savory, and perfect for cool weather. Enjoy!

(I tried to find a good photo to add here but every image I found had visible carrots, tomatoes, or celery in the meat and rather than mislead you, this is a plain post.)

Sausage Gravy-Stuffed Biscuits

We made this up as we went along in prep for a BYO brunch. They were a huge hit and had I known that, I’d have taken photos as the process was happening. Alas.

Everyone makes sausage gravy differently and as your southern friends will tell you, there are usually no measurements involved for any of it. So I am going to list for you here the ingredients, the basic technique, and leave you to make the gravy as you like best (or find a recipe online somewhere to guide you, but having not tried any of them I can’t vouch for their quality). It’s worth the trial and error and when in doubt, use more gravy!

Ingredients

  • 1 package Pillsbury Grands! buttermilk biscuits (you could use a store brand too, I am sure. We used Pillsbury so if you use a store brand to success, let me know)
  • 1 egg white, beaten – add 1T of water if you double the recipe
  • They come five biscuits to a roll, we used two packages to make 10 biscuits
  • White flour
  • Breakfast sausage, cooked and crumbled with a few larger chunks (dice-sized) in there
  • Milk (2% or 1% with half & half added, you want the fat)
  • LOTS of black pepper, preferably fresh cracked
  • Salt
  • And if you’re feeling weird and adventurous, liquid smoke and/or cayenne

Instructions

  1. Make your sausage gravy using all of the above ingredients but the biscuits and egg whites. It should be thick and not runny, thinner than cookie dough but thicker than spaghetti sauce.
  2. Cower in fear as you whack the biscuit can on the side of your counter to open, breathe sigh of relief when it doesn’t explode your kitchen.
  3. Separate the biscuits and press them flat on a parchment-lined baking tray, about 1/4″ thick and 6″ across or so, using a rolling pin if you have to.
  4. Spoon a good amount of the gravy in the middle, about 1T or so, and gather the sides of the biscuits up until they meet. Pinch them closed so there is no gravy visible. Flip them over so the smooth side faces up.
  5. Brush tops of biscuits with beaten egg whites, sprinkle a bit of black pepper on top if you like
  6. Bake according to biscuit package instructions, serve while still very warm.
  7. Reap accolades and high fives (and maybe take some pictures)


Olive Garden’s Pasta e Fagioli

Between the ages of 17-19, I worked at The Olive Garden next to Spring Hill Mall, in Suburban Chicago, Illinois. I was there for the introduction of The Gateway to Hell, aka, The Never-Ending Pasta Bowl, and I worked there before they renovated the place into the Tuscan-inspired stucco style it is today (it’s better now). I often told people that I’d eat off the floors, the place was so clean. It was the best and most professional restaurant service training I’ve ever received, before or since, and I stand by the quality of their ingredients. It’s a guilty pleasure going there, minus the guilt. It’s not real Italian, the way fast food burgers aren’t really burgers, but it’s its own thing and has its place.

They had only three soups back then, with the spicy potato sausage soup being the new addition (it was a long time ago), and their minestrone which I would make if I could figure out how to keep the veggies from becoming mush.

This chili-style soup though, was always a go-to. It’s satisfying and can be customized in lots of ways for your taste requirements.

Copycat Olive Garden Pasta e Fagioli

Ingredients

  • 1 lb lean ground beef or mild Italian sausage
  • 2 Tbsp olive oil , divided
  • 1 1/2 cups chopped yellow onion
  • 1 cup diced carrots (about 2 medium)
  • 1 cup diced celery (about 3 stalks)
  • 3 cloves garlic, minced (1 Tbsp)
  • 3 (8 oz) cans tomato sauce
  • 2 (14.5 oz) cans low sodium chicken broth or beef broth
  • 1/2 cup water, then more as desired
  • 1 (15 oz) can diced tomatoes
  • 2 tsp granulated sugar
  • 1 1/2 tsp dried basil
  • 1 tsp dried oregano
  • 3/4 tsp dried thyme
  • 1/2 tsp dried marjoram
  • Salt and freshly ground black pepper to taste (I add a lot of pepper, it’s great peppery. Definitely test often for salt, it’s very bland without a lot)
  • 1 scant cup dry ditalini pasta (I used a full cup, I’m a rebel who likes pasta)
  • 1 (15 oz) can dark red kidney beans, drained and rinsed
  • 1 (15 oz) can great northern beans, drained and rinsed
  • Finely shredded Romano or Parmesan cheese, for serving

Instructions

  1. Heat 1 Tbsp olive oil in a large non-stick saucepan over medium high heat, crumble in ground beef or sausage and cook, stirring occasionally until cooked through. Drain fat from beef then transfer beef to a plate, set aside.

    Heat remaining 1 Tbsp olive oil in same large saucepan, onions, carrots, and celery over medium-high heat until tender about 6 minutes, add garlic and saute 1 minute longer. Reduce heat to a low, add tomato sauce, beef broth, water, canned tomatoes, sugar, basil, oregano, thyme, marjoram and cooked beef then season with salt and pepper to taste. Cover with lid and allow to simmer, stirring occasionally, until veggies are soft, about 20 minutes.

    Meanwhile prepare ditalini pasta according to directions on package, cooking to al dente.

  2. Add cooked and drained pasta to soup* along with kidney beans and great northern beans. Thin with a little more water if desired. Allow to cook 2 minutes longer. Serve warm with grated Romano or Parmesan cheese.

    * If you don’t plan on eating all of the soup right away I recommend adding the pasta to individual servings. Then whatever is left over you can add the pasta to that the next day. Otherwise the pasta get’s really soggy and soup doesn’t have enough liquid.*

    ****

    * This is extremely true. I made the pasta and kept it in a separate container once it cooled, then microwaved it and added it to the soup as needed. It WILL get soggy and gross, so definitely do this if you don’t plan to eat the whole batch at once.

    You want this thick like chili, with some liquid throughout.

    pasta_e_fagoli-2

    Recipe author’s photo, highly accurate. More cheese = more better!